Keys and certificates
tl;dr
- Want to experiment? Go straight to the tutorial. You'll use self-signing for now and can think about certificates later.
- Already have certificates, or want to buy them? Read on.
Features
- Passphrase protection. You can encrypt your private keys. See below.
- Hardware security modules. You can use private keys protected by physical tokens, remote HSMs and cloud key storage. See below.
- CSR generation. Conveyor can help you acquire certificates by generating the CSR files you upload to certificate authorities.
Keys in Conveyor
Every operating system uses code signing to establish stable identities for programs that don't change when new versions are released, and to secure the software update process. Windows and macOS additionally use signing as a way to block malware.
Conveyor therefore needs keys for the following purposes:
- Signing Windows MSIX packages, and the EXE/DLL files they contain.
- Signing macOS .app folders.
- Signing Debian/Ubuntu apt repository files.
- Signing macOS Sparkle XML update feeds.
These keys are of different types, but fortunately they can all be generated by transforming a single root key without loss of security. Your root private key is an ordinary config setting. The defaults.conf file in your home directory is automatically included into every build config, which is why the conveyor keys generate command puts your key there. However there's nothing special about this file and you can store the signing key anywhere else that config can be loaded from.
The words form is intended to be easy to write down with a pen and paper. Add line breaks and indentation if you wish using triple quote syntax ("""foo"""). The words contain a checksum so mistakes can be detected quickly.
Important
- Keep your new
defaults.conffile outside of version control and back it up. - The words come from a pre-selected list, so don't try to create a custom sentence.
Is signing worth it?
It's worth signing your code if you are targeting non-developers, or are writing developer tools that might be interfered with by Windows anti-virus tools. Conveyor is fully signed because we want it to be as easy to use and robust as possible. Additionally, signing isn't security theater. It actually does make malware harder to produce and distribute, which is why modern virus writers put effort into stealing signing keys.
For macOS Apple uses the name on your credit card and you can obtain personal certificates within a few minutes. For Windows you can use any certificate authority, but they may request to see government issued ID. The effort involved in ID verification depends on whether you are signing as a person or as a company. For an organizational certificate you will need to receive a phone call to verify that you are genuinely an employee.
Making self-signed apps easier to use
Although Conveyor removes a lot of the technical effort involved in signing, the best/standard user experiences still require certificates to be purchased. Over time we plan to make software distribution easier using sandboxing.
Certificates in Conveyor
Certificates link your public key to a verified identity. Conveyor supports the following certificate formats:
.cer/.pem- ASCII encoded. This is sometimes called PEM format..p12/.pfx- Binary encoded.
When using a .p12 or .pfx file, you must supply a passphrase.
Usually, certificate authorities give you several options for what format you download them in. When possible pick the option named something like "PEM with all certificates included". Your certificate file must include not only your own but also any intermediate certificates.
Important
You may have certificates in a .p7b file. Currently this format is not supported. Request a different format from your CA.
If you already have certificates
Export them to .cer, .pem, .p12 or .pfx files:
- macOS: Export the keys from Keychain Access to a .p12 file (see below). Set
app.mac.signing-keyto point to that file. If you have a separate key and certificate file, setapp.mac.certificateto point to the.cerfile. - Windows: Set
app.windows.signing-keyto the path of either a .p12/.pfx file containing your private key and certificate, or setapp.windows.signing-keyandapp.windows.certificateseparately.
To learn more about configuring keys and certificates see signing configuration.
Exporting keys from Mac Keychain Access
Step 1. You need to have a "Developer ID Application" certificate. Other types won't work. Open Keychain Access and locate your Developer ID certificate and associated private key:
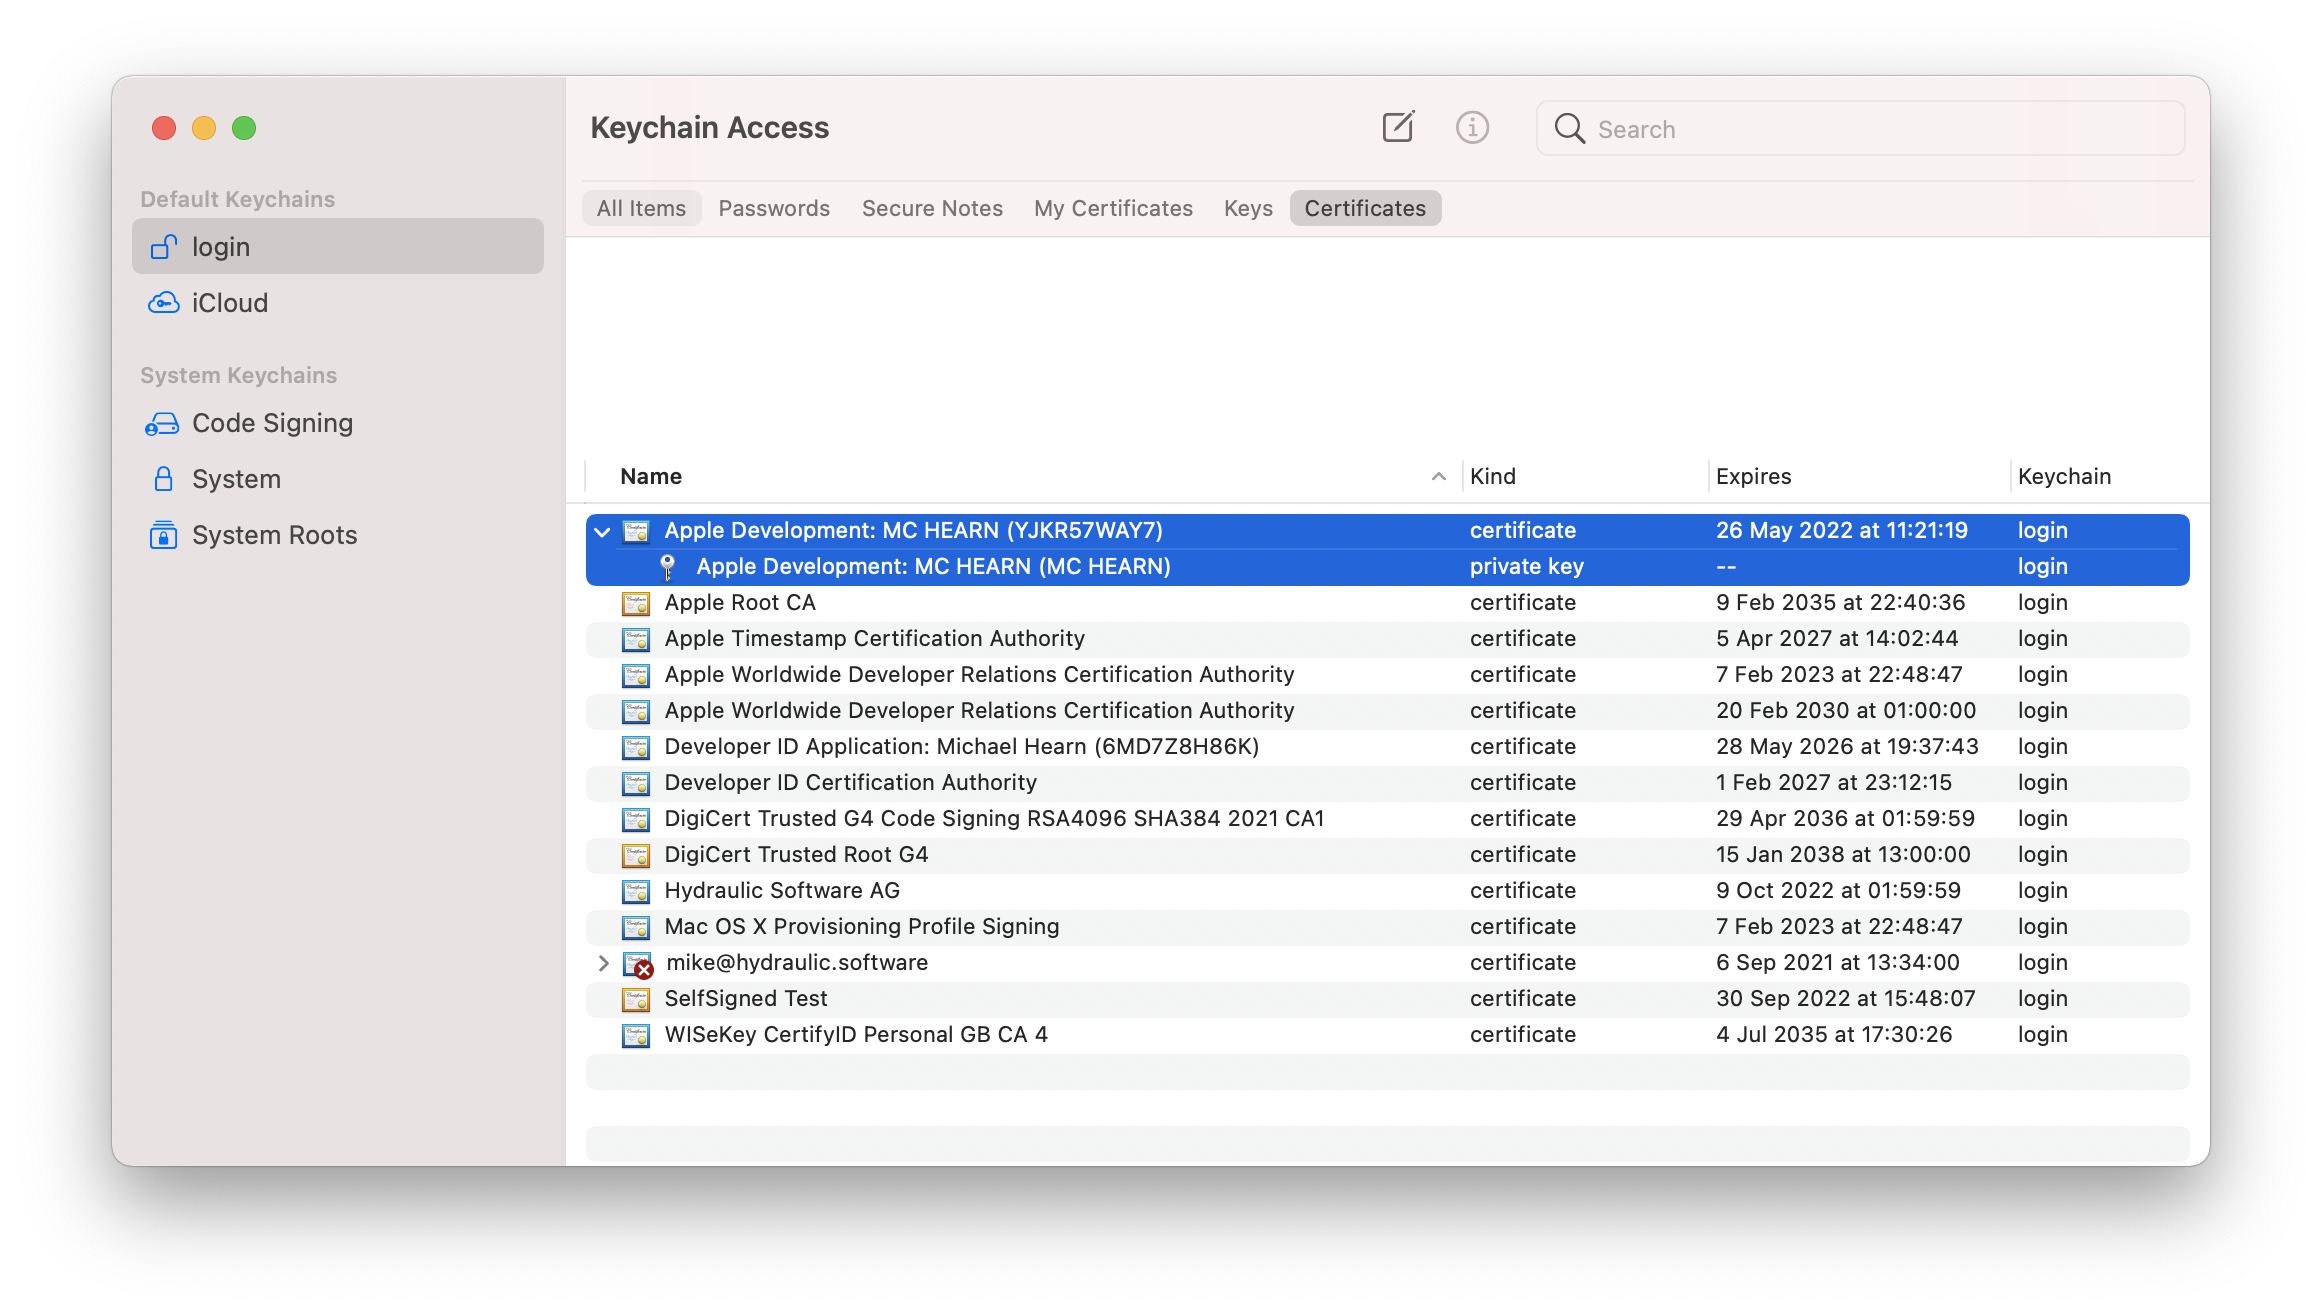
Step 2. Select both, right click and choose "Export 2 items". Save as .p12 format.
Step 3. Pick a strong passphrase and enter it. It may have spaces in it. Click OK.
Step 4. Enter your login password to unlock the keychain. The export should now complete.
If you want certificates
When you ran conveyor keys generate it also produced two certificate signing request files (.csr). These can be uploaded to certificate authorities to get signing certificates.
- If distributing to macOS:
- Log in using an Apple ID to the Apple developer programme. Joining will require a credit card payment.
- Request a "Developer ID Application" certificate using the Apple Developer console. You can do this with any web browser and operating system, but you must be the account holder.
- Upload the
apple.csrfile that was created next to yourdefaults.conffile when you created your root key above. - You'll get a
.cerfile back immediately. There is no review or approval process because the verification is linked to your credit card details.
- If distributing to Windows:
- Pick a certificate authority that sells Authenticode certificates. DigiCert is a good choice. Please refer to this FAQ section for more information on the difference between normal and EV certificates.
- Upload the
windows.csrfile that was created next to yourdefaults.confwhen you created a root key above. You will need to verify your identity with the CA. - They will give you back a certificate in a format of your choice. Conveyor understands several but PEM works well.
The private keys backing the certificate requests aren't written to disk separately. They're all derived on demand from the contents of the app.signing-key config value. To export them, see below.
If you don't want certificates
Then do nothing! Conveyor will still sign your packages using your root key, but it'll generate and use a self-signed certificate. That certificate will be put in the download site along with a couple of scripts: a shell script for macOS and a PowerShell script for Windows. The download HTML will then instruct the user to run a command from their terminal that downloads and runs the scripts, which in turn then download and install the application, taking the necessary steps to ensure it can run.
On Windows this requires installing a certificate to the local certificate store, which requires local administrator access. Non-admins can still use your app by downloading the .zip file (which is always created), but they won't get automatic updates. If you're distributing to managed Windows networks then the IT department can deploy the certificate and MSIX files directly using Microsoft Active Directory and InTune.
On macOS the package is signed but only Apple certificates are accepted by Gatekeeper, so the shell script will download the app, extract it to either /Applications or ~/Applications, remove the quarantine flag and then invoke it. Avoiding the GUI and downloading the package using curl bypasses Gatekeeper and allows the code to run. This is also true for M1 Macs, which require code to be signed but not necessarily signed by Apple.
Configure Apple notarization
Apple requires all Developer ID signed apps to be uploaded to them for a form of ahead-of-time virus scanning, called notarization. This is different to the app store - approval is automatic with no humans in the loop and takes only a minute or two.
Conveyor needs to be provided with an Apple ID and credentials for the notarization service. Any Apple ID registered with the developer programme can get these.
To set it up add the following to your config (or better, your defaults.conf):
1 2 3 4 5 6 7 8 9 | |
Generate an app specific password from the security section of your Apple ID account webpage. The team ID can be found in the Apple developer console under "Membership".
Tip
You can use move your app specific password outside of a per-project config by using an include statement, or by writing ${env.SOME_ENV_VAR} to use an environment variable.
Example
Here's what a finished defaults.conf might look like:
1 2 3 4 5 6 7 8 9 10 | |
The apple.cer and windows.cer files are then stored in the same location. Since the certificates are public, there's no need to hide them.
In such situation, the only thing that's sensitive is the keys. If you're letting Conveyor derive keys from the root entropy for you,
the plain-text value of the app.signing-key can be moved into either a secret file or a secret environment variable - please see the
continuous integration page for an example of how it can be achieved.
Exporting derived keys
To get the platform-specific private keys in formats understood by other programs use conveyor keys export. It will create:
apple.p12A DER encoded PKCS#12 key store, encrypted under the password "conveyor" (note: not your regular passphrase - to change it you can usekeytooloropenssl, or just import it using Keychain Access and then delete it).windows.keyPEM encoded private key, RSA 4096 bits.sparkle.keyEd25519 private key + public key point, base64 encoded. This format is the one used by the Sparklegenerate_keyscommand.gpg.keyA GPG/PGP secret keyring that you can use withgpg --import.
Passphrases
Keys can be encrypted under a passphrase. You'll be asked for one when using conveyor keys generate and you can change it with conveyor keys passphrase.
You can pass the passphrase programmatically using the --passphrase flag. If given a value that starts with env: then the rest is the name of an environment variable containing the passphrase. This is useful for continuous build systems. Otherwise the value is the passphrase.
The same passphrase is used for the root key, any PKCS#12 files (.p12 or .pfx) and hardware security modules. Therefore they must all match. Using different passphrases for different key stores isn't supported at this time.
Hardware security modules
Conveyor can use keys stored in hardware security modules. This is useful because Extended Validation certificates can buy you some initial reputation with Windows SmartScreen, but they must be held in an HSM/token.
Using a token is simple:
- Install the drivers for your host platform (it doesn't have to be Windows).
- Find the path to the PKCS#11 driver library. HSM user guides will often give you this path under instructions for setting up Firefox or Thunderbird.
- Set the path as the value of
app.windows.signing-key.
Example for using a SafeNet HSM from MacOS:
1 | |
Then make sure to use the --passphrase flag, and you should be set.