Windows
Synopsis
app.windows {
  # Windows specific inputs.
  inputs = [ ... ]

  # Controls whether a terminal window appears on startup.
  console = false

  # What online update style to use.
  updates = background

  # Whether to sign the EXE/DLL files or not (true/false).
  sign = ${app.sign}
}
Keys
app.windows.updates See update modes.
app.windows.timestamping-server URL of a cryptographic timestamping server (often called a timestamping authority or TSA). These are usually run by certificate authorities. Defaults to using Certum because their timestamping server is fast and well run, but you can use any TSA that is trusted by Windows. The URL must start with http:// because the TSA protocol doesn't use SSL.
app.windows.sign Boolean, controls whether to sign the Windows EXE/DLL/package files or not. If false then you can't produce an MSIX file. Defaults to the value of ${app.sign} (which is true).
app.windows.signing-key, app.windows.certificate See signing keys.
app.windows.override-icon Boolean. If an icon is already present in the EXE resources, controls whether to replace it with the icon produced by Conveyor. Useful when working with frameworks that use their own logo as the default EXE icon.
Start on login
app.windows.start-on-login If true then your app will be started automatically when users log in to Windows.
No user interaction or confirmation is required so be careful not to abuse this. The user can disable/enable startup via the Task Manager, and there's no programmatic way to override the user if they disable your startup item there.
You can programmatically enable/disable these items using the WinRT StartTask API (these APIs are available by default and can be accessed from ordinary C++). The startup task ID is the identity name of your app concatenated with .StartupTask, where the identity name can be explicitly controlled but defaults to the app.fsname key converted from kebab-case to PascalCase.
Console key
app.windows.console Windows requires a program to declare up front if it's a command line or GUI app using a flag in the EXE file headers. If an app is declared GUI then anything it prints to stdout/stderr won't appear anywhere, not even when run from the command line. If it's declared to be a command line app and run from outside a terminal, then a console window will appear alongside the app's main window.
Normally this header is set by the compiler. Conveyor can set it for you to the value of the app.windows.console key. If you don't specify this setting then Conveyor will attempt to guess, based on the presence of DLLs that are known to be used by JVM GUI toolkits. If DLLs for AWT/Swing, JavaFX, SWT, Skiko/Jetpack Compose or LWJGL are present then it's believed to be a GUI app. Otherwise it's a console app. If this heuristic isn't good enough then please let us know so we can update it, and then set the key explicitly.
When a package contains console mode EXEs your MSIX package will register itself as a command line app. The moment installation completes it becomes accessible in all running terminal sessions.
What if your app is both a CLI and a GUI app simultaneously? You can certainly still accept command line switches, even for GUI mode apps. It's only console output and input that's affected by this flag. If you need both then you will need to prepare separate EXEs for your app, one for each mode, and provide them as Windows-specific inputs. The GUI mode exe should have the same name as the generated launcher would: ${app.display-name}.exe. The CLI mode exe can be named whatever you want.
Manifest keys
Manifests are XML files that control how your app is managed by the operating system. There are two different manifests, but they use some of the same data.
app.windows.manifests.version-quad A four-part numeric version derived from app.version if not specified. Example: "1.2.3.4".
app.windows.manifests.validate The MSIX manifest XML is validated against Microsoft's schemas because non-validating XML won't install. In the unlikely event this goes wrong and you need to disable it, set this to false. Normally you will never encounter validation errors, but if you alter the manifest properties or provide your own XML you may encounter such issues.
The MSIX manifest
An XML file in the final generated MSIX package. It controls many different integration points with the OS, including:
- Package metadata, which controls how your app appears in the confirmation screen the user sees when they open the package.
- Compatibility information: min Windows version required and max version tested, which can be used to tell the user they can't install the app, and which may change how Windows applies backwards compatibility logic.
- The name of the EXE file that should be run from the start menu.
- Permission/capability requests.
A full schema is available here. Some parts of the default manifest can be controlled via configuration, but you can also completely replace the manifest with your own.
app.windows.manifests.msix.min-version Which version of Windows is required to run this application. Defaults to 10.0.17763.0 i.e. Windows 10 build 17763, which was released in November 2018 (codename "Redstone 5").
app.windows.manifests.msix.max-version-tested Which version of Windows the app has been tested on. This is used by Windows to detect packages for apps that have stopped being maintained and thus may need workarounds for bugs. The version this is set to will be updated with time to reflect whatever the latest versions of Windows 10 are, reflecting the assumption that if you're rebuilding your packages then the app is in active use and being tested.
app.windows.manifests.msix.capabilities = [ "rescap:runFullTrust" ] The list of requested permissions, as documented by Microsoft. A string can be prefixed by a namespace code like uap: or uap2: to put the <Capability/> tag into the right namespace.
By default the app requests rescap:runFullTrust which is intended for normal Win32 apps, and means the app is hardly sandboxed at all. A small amount of filesystem virtualization is applied to ensure the app can be uninstalled cleanly and apps aren't allowed to write to their own install folder, but that's about it. You shouldn't list any other capabilities unless you are explicitly using modern UWP Windows APIs that support sandboxing.
app.windows.manifests.msix.identity-name An ASCII name for the program used for internal identification, that doesn't have to be globally unique. If written in lower case kebab-case it will be converted to PascalCase to match the normal Windows style. Defaults to ${app.fsname}, which will get converted to PascalCase.
app.windows.manifests.msix.application-id An ASCII name for the identification of the applications within the package, that doesn't have to be globally unique. If written in lower case kebab-case it will be converted to PascalCase to match the normal Windows style. Defaults to ${app.fsname}, which will get converted to PascalCase.
app.windows.manifests.msix.{display-name,description,vendor} Package metadata that will appear in the Windows user interface. Taken from the top level app metadata by default but can be overridden.
app.windows.manifests.msix.extensions-xml Raw XML that will be added into the <Extensions></Extensions> tag in the manifest. Useful for adding operating system integrations that Conveyor doesn't yet support out of the box.
app.windows.manifests.msix.additional-properties-xml Raw XML that will be added into the <Properties></Properties> tag in the manifest. Useful for adding operating system integrations that Conveyor doesn't yet support out of the box.
app.windows.manifests.msix.virtualization Virtualization options. See Virtualization for details.
app.windows.manifests.msix.namespaces A map of namespace ID to XML namespace URL. You can use this to add declarations of additional namespaces if the default list doesn't have the one you need. The list of XML namespaces in the default config is:
com:http://schemas.microsoft.com/appx/manifest/com/windows10com2:http://schemas.microsoft.com/appx/manifest/com/windows10/2desktop:http://schemas.microsoft.com/appx/manifest/desktop/windows10desktop2:http://schemas.microsoft.com/appx/manifest/desktop/windows10/2desktop3:http://schemas.microsoft.com/appx/manifest/desktop/windows10/3desktop4:http://schemas.microsoft.com/appx/manifest/desktop/windows10/4f2:http://schemas.microsoft.com/appx/manifest/foundation/windows10/2iot:http://schemas.microsoft.com/appx/manifest/iot/windows10rescap:http://schemas.microsoft.com/appx/manifest/foundation/windows10/restrictedcapabilitiesrescap2:http://schemas.microsoft.com/appx/manifest/foundation/windows10/restrictedcapabilities/2rescap3:http://schemas.microsoft.com/appx/manifest/foundation/windows10/restrictedcapabilities/3rescap4:http://schemas.microsoft.com/appx/manifest/foundation/windows10/restrictedcapabilities/4rescap6:http://schemas.microsoft.com/appx/manifest/foundation/windows10/restrictedcapabilities/6uap:http://schemas.microsoft.com/appx/manifest/uap/windows10uap2:http://schemas.microsoft.com/appx/manifest/uap/windows10/2uap3:http://schemas.microsoft.com/appx/manifest/uap/windows10/3uap4:http://schemas.microsoft.com/appx/manifest/uap/windows10/4uap5:http://schemas.microsoft.com/appx/manifest/uap/windows10/5uap6:http://schemas.microsoft.com/appx/manifest/uap/windows10/6uap7:http://schemas.microsoft.com/appx/manifest/uap/windows10/7
app.windows.manifests.msix.ignorable-namespaces A list of XML namespace IDs to add to the IgnorableNamespaces attribute on the root element. This is part of how Microsoft enables graceful degradation on older versions of Windows. The default list is [ rescap6, uap7, uap8 ].
app.windows.manifests.msix.content If set, supplies a string containing a complete manifest that replaces the standard one. The other keys will be ignored in this case, as they are only used to customize the built-in template.
Virtualization
Windows provides a virtualization mechanism that aims to provide a clean uninstall, by ensuring that the app-private files and registry keys belonging to a given app can be identified and removed along with it. This is implemented by redirecting writes to the user's AppData directory to an app-specific location created by Windows. The app is unaware this is happening because it sees an overlay filesystem view.
There are some circumstances where apps might need to share data with each other, and Microsoft provides a mechanism to allow excluding certain files from virtualization. Conveyor makes it simple to use this mechanism by providing the following key:
app.windows.manifests.msix.virtualization.excluded-directories List of strings containing directories that should be excluded from virtualization. The first part of each directory must be the name of a Known Folder such as RoamingAppData or LocalAppData. For example:
app.windows.manifests.msix.virtualization {
  # Exclude the entire RoamingAppData folder from virtualization.
  excluded-directories += RoamingAppData

  # Exclude a single folder within LocalAppData folder from virtualization.
  excluded-directories += LocalAppData/OtherAppsFolder
}
Setting this key will not only generate the correct fragment of the MSIX manifest, it will also implicitly enable the unvirtualizedResources restricted capability, which is necessary in this case.
UNIX domain sockets
Some versions of Windows have a kernel bug that breaks UNIX domain sockets when they are stored in a virtualized directory. This particularly affects Java 19+ because it uses a UNIX domain socket as part of establishing outbound TCP connections. When your app uses a JVM and conveyor.compatibility-level >= 8 the excluded-directories key will have LocalAppData/Temp added to it, thus excluding the temp dir from virtualization.
Old Windows 10 versions
Windows 10 builds before 21H1 will have filesystem virtualization disabled entirely when there are any excluded directories, as the ability to control virtualization on a per-directory level was only introduced in that version.
The EXE manifest
An application manifest is an XML file embedded into the executable of a program. It controls:
- Backwards compatibility modes.
- Whether the app needs administrator privileges or not (see below).
- HiDPI scaling options.
- Scroll event resolution.
And a variety of other operating system behaviours. The default manifest provided by Conveyor should be sufficient for most apps, and will replace whatever is found in the binary.
You can adjust some of the values using config keys; if they don't meet your needs then just replace the entire content.
app.windows.manifests.exe.content The EXE manifest XML embedded into the binary. It incorporates the following keys into the default XML content:
app.windows.manifests.exe.requested-execution-level See below. One of:
asInvoker- whatever privilege level the user has.highestAvailable- whatever privilege level the user can potentially escalate to.requireAdministrator- requires administrator access and cannot run without it (see below).
Visual C++ redistributables
If your app needs the MSVC++ runtime DLLs you should ship them with your app, as Windows doesn't come with these DLLs out of the box. Conveyor has built in support for this.
Requesting administrator access
To show a request Windows administrator access for your program you will need to set two keys:
app {
    // Request administrator access.
    windows.manifests {
        exe.requested-execution-level = requireAdministrator
        msix.capabilities += "rescap:allowElevation"
    }
}
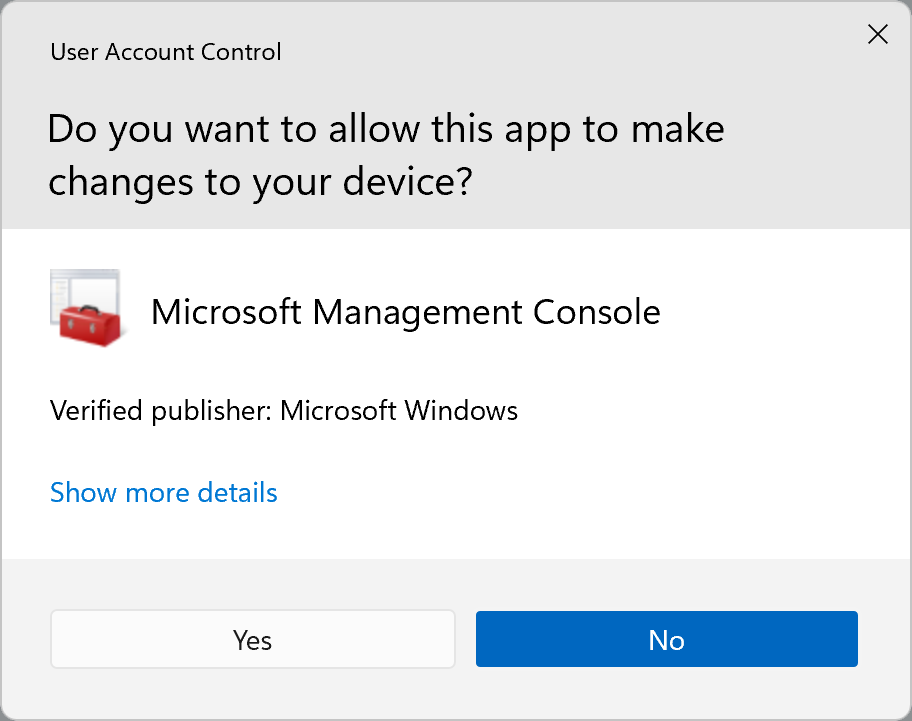
The user will see a UAC prompt that looks like this one:
Application User Model ID (AUMID)
If you need to know your app's AUMID, just run:
conveyor make app-user-model-id
It will output the AUMID to the standard output.
Release to the Microsoft Store
Conveyor supports releasing to the Microsoft Store. This can be a great choice as the store offers various useful features and an account is much cheaper than buying a code signing certificate.
The first thing you need is to set up an account at the Microsoft Partner Center:
- Register as a Windows app developer in Microsoft Partner Center.
- Have a tenant associated with your Partner Center account. You can achieve that by either associating an existing Azure AD in Partner Center or by creating a new Azure AD in Partner Center.
With the account properly set up, you'll need to make the first release. Due to limitations in the Store API, the first submission of your app has to be done manually.
- Make sure you're logged in to Partner Center as the Azure AD tenant user name (e.g.
user@yourdomain.onmicrosoft.com). If you're logged in as a personal user name you may receive permission errors when reserving your app name. - In the Partner Center, reserve your app's name. Make sure to select MSIX or PWA app when specifying the app type.
- In your
conveyor.conf, make sure yourapp.display-namematches the name you reserved for your app. -
In the new app overview, go to the Product Identity page. You'll need to fill out the
app.windows.storekeys in yourconveyor.confwith the values from this page as follows:app.windows.store.identity-name: copy the value of the Package/Identity/Name fieldapp.windows.store.publisher: copy the value of the Package/Identity/Publisher field.app.windows.store.publisher-display-name: copy the value of the Package/Properties/PublisherDisplayName field.app.windows.store.store-id: copy the value of the Store ID field.
-
If you've already configured a regular Windows signing certificate set
app.windows.certificate = "self signed by "${app.windows.store.publisher}"in your config to turn it off and use self-signing (you don't need to, and should not, CA sign a Microsoft Store upload).
For example, if the Product Identity page looks like this:
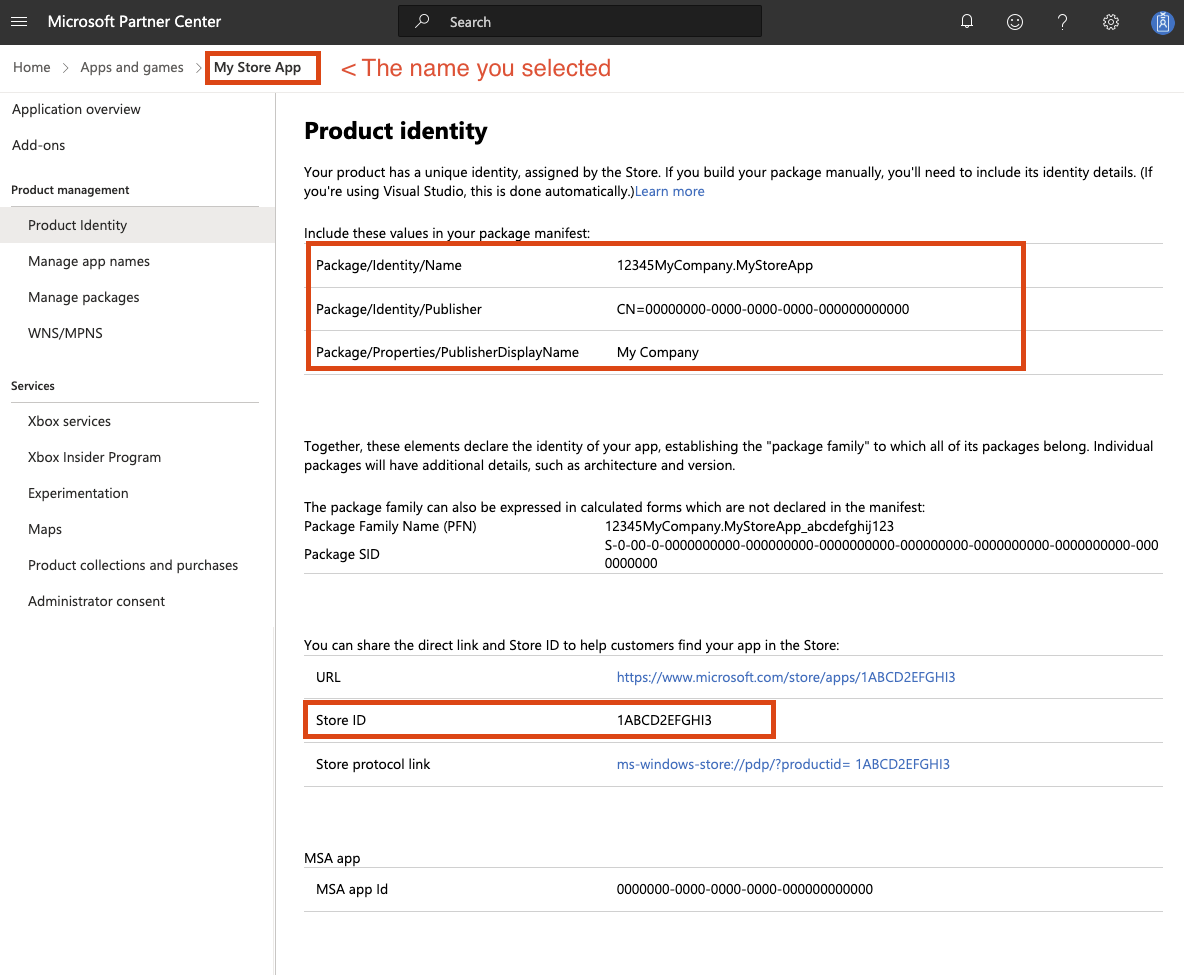
Then these fields in your config should look like this:
app {
    display-name = "My Store App"

    windows {
        store {
            identity-name = "12345MyCompany.MyStoreApp"
            publisher = "CN=00000000-0000-0000-0000-000000000000"
            publisher-display-name = "My Company"
            store-id = "1ABCD2EFGHI3"
        }

        // Optional, see above.
        certificate = "self signed by "${app.windows.store.publisher}"
    }
}
- As a quick double check, run
conveyor make app-user-model-idand ensure the output string matches the "Product Family Name" on the product identity page. - Build the initial version of your app by running
conveyor make windows-msix. It will generate an MSIX file in theoutputdir that you'll need to submit to the store.
Creating the initial submission
Create an app submission for your app.
- Go to App Overview and click Start Submission. In the Packages section, upload the MSIX file generated in the previous step. Fill out the other details as required (screenshot, privacy policy etc).
- When asked why you need
runFullTrust, say: "This is a native Win32 app and thus cannot run in the UWP sandbox". - If asked why you need
unvirtualizedResources, say "This is required to work around a Windows bug affecting UNIX domain sockets that can cause Java apps to crash".
Once your initial submission gets approved, Conveyor can manage the updates for you. You'll need to authorize Conveyor to send submissions on your behalf:
- Create a new Azure AD application to be used by Conveyor. You can enter any valid address for Reply URL and App ID URI, as long as those values are not used by any other Azure AD application in your directory. A simple suggestion is to use
https://<your microsoft domain>.onmicrosoft.com/conveyorfor both. Select Manager (Windows) as the role for this new application. - Select the newly created application and click Add new key. Take note of the Client ID and Key values, copy them into your Conveyor config
as the values for
app.windows.store.client-idandapp.windows.store.client-secretrespectively. - Click Cancel to go back. Take note of the Tenant ID, copy it into your
conveyor.confas the value forapp.windows.store.tenant-id.
Now you can run conveyor make ms-store-release, and Conveyor will submit the new versions of your app directly to the Microsoft Store.
Microsoft Store caveats
Here are some Microsoft-imposed limitations to be aware of when publishing to the store:
- You can't switch between out-of-store and in-store distribution.
- You can't use aggressive updates mode.
- The
app.revisionnumber must be zero as the store uses the revision number for its own purposes. - The first version of your app must be uploaded manually.
- Microsoft may need to verify your identity as part of setting up an account.
- There is a setup process required to both create your app entry, and enable Conveyor to push to it.
- There are various policies you must comply with, for example, it must be possible for an app tester to log in.
Additionally, Conveyor's aggressive updates mode doesn't currently work with Store apps.